Do you want to learn how to transfer Ancestry DNA to Gedmatch? It's free, easy, and the steps in this post will show you exactly how to do it.
Getting your DNA transferred to Gedmatch from Ancestry to Gedmatch is only the beginning. I have written many helpful posts to help you understand how to use the amazing DNA analysis tools on the site.
You can find my list of Gedmatch posts at the very end of this article.
What are the steps to transfer DNA from Ancestry to Gedmatch?
First, it should be noted that we don't transfer our actual DNA to Gedmatch. Instead, we want to transfer our DNA information from Ancestry DNA to Gedmatch.
Ancestry DNA allows us to download our DNA information in a file that is compatible with Gedmatch software. This enables us to use the Gedmatch site to find new DNA matches and perform advanced DNA analysis using the free tools available.
This is, basically, a two-step process:
- Download DNA file from Ancestry DNA
- Upload DNA file to Gedmatch
What to do after you have uploaded your Ancestry DNA file to Gedmatch
Now that you have created your Gedmatch account and uploaded your Ancestry DNA file, your Gedmatch journey has only just begun!
The Gedmatch site sometimes seems overwhelming at first glance, and so I would recommend taking some time to read about some of the most popular tools.
Once you familiarize yourself with the capabilities of Gedmatch and how to understand the results you get from the tools, you will come to love Gedmatch as much as I do.
Below, I'll take you through the two-pronged process I mentioned above.
How to download your DNA from Ancestry to upload to Gedmatch
In order to download your DNA file from Ancestry, you will first need to access your DNA test settings. This is different than your general Ancestry account settings or your family tree settings.
To access your DNA test settings, you must be on your main DNA results page, also known as the DNA Insights page. This page can be accessed by clicking here (you'll need to log in) or by clicking on the DNA tab on the top menu of your Ancestry home screen.
Once you are on your DNA results page, you can access your testing settings by clicking on the "Settings" button near the gear icon. On a desktop computer (recommended for this process), this is located at the top right of the page, as circled in the image below:


On your test settings screen, you will need to scroll all the way down to the bottom to access the option to download your DNA. The DNA download option is currently located in the final section under the Test Management > Actions heading:
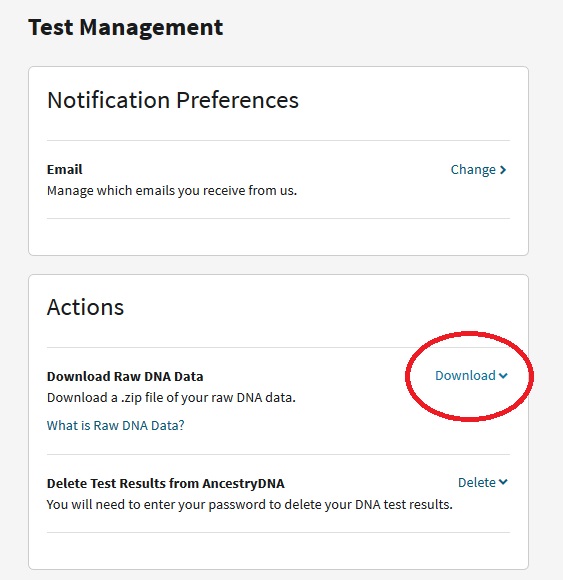
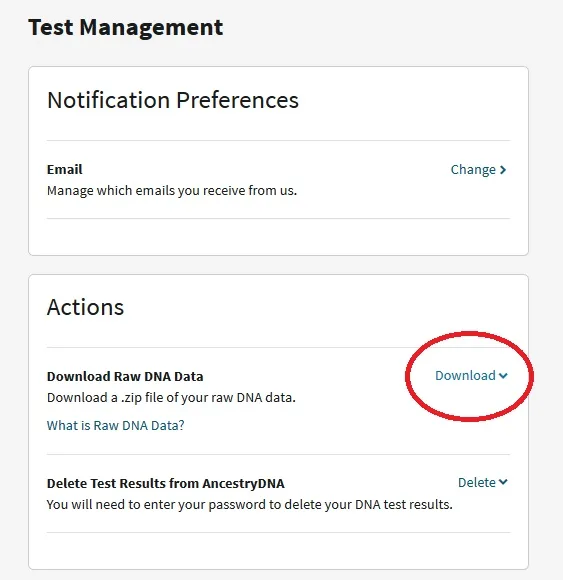
Clicking on the download link, as shown in the image above, will expand the menu. You will be prompted to enter your Ancestry DNA password, which will then trigger a multi-step process.
You'll receive a confirmation e-mail, which is basically a security measure to protect your data. Once you click on the link in your confirmation e-mail, Ancestry DNA will begin preparing your DNA information for download, and you will receive an e-mail when it is ready.
If you need further information about what to expect in this process, you can read a post I wrote about it in more detail here.
Once your Ancestry DNA file is on your computer, you are ready to move on to the next step, which you can find outline below.

How to upload Ancestry DNA data to Gedmatch
In order to complete this step, you will need to make sure that you have a Gedmatch account. It's free, and you can create an account in a matter of a few minutes.
This process is best completed from a laptop or desktop computer, but could be done from a tablet or telephone. I recommend using a laptop, tablet, or phone, in that order.
To create your Gedmatch account, you must visit the Gedmatch homepage. You can click on the link below:
Once you have created your account, simply log in to the site. You will see your main Gedmatch "dashboard".
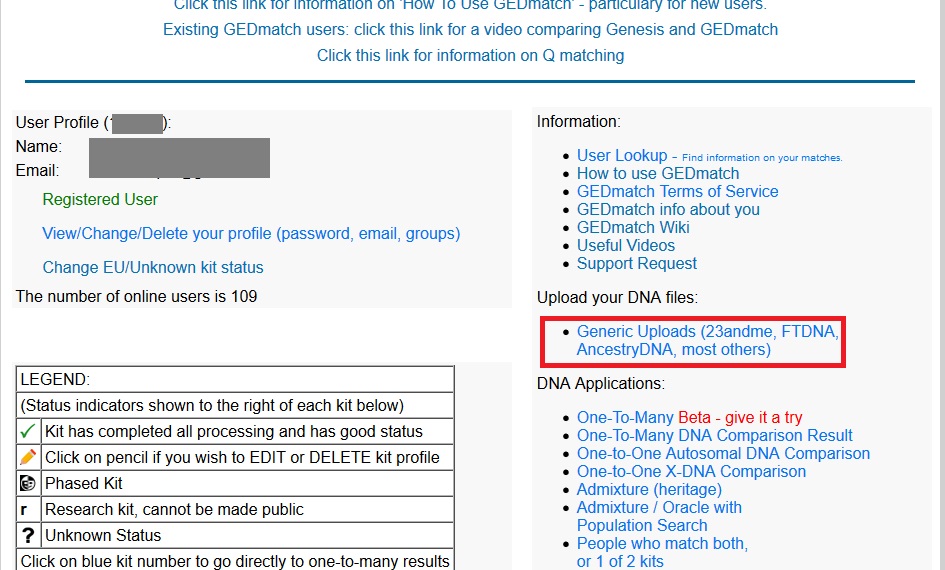
In order to get started with your upload, click on the "Generic Uploads (23andme, FTDNA, AncestryDNA, most others)" link, which can be found under the Upload your DNA files heading on the right side of the page.
You can see in the image below exactly where you should click to get to the upload page:

On the upload screen, which is the next page that you'll see, you will have the opportunity to enter in details connected to the DNA file that you would like to upload.
The form is relatively straightforward, but there are a few things that you should know.
For example, you must enter in the DNA donor's real name. If you don't want the real name displayed for other Gedmatch users, enter in an alias in the "Alias" field below.

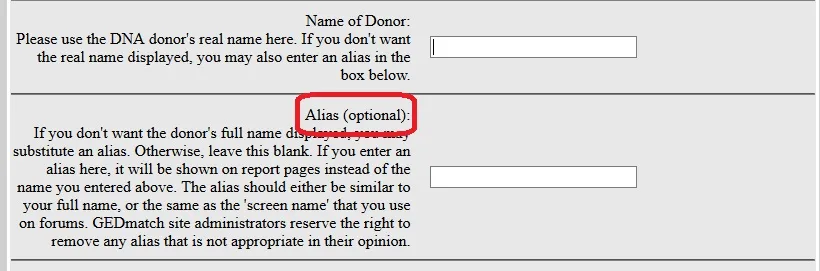
If you decide to display an alias, the alias will be listed on people's DNA match list with an asterisk next to it. In other words, your DNA matches will know that you are using an alias.
Not every DNA test provides users with their mtDNA and Y-DNA haplogroup. Most relevant to this post, Ancestry DNA does not test for haplgroups.
Below, you can see the fields that request your haplogroups. If you don't know them, you can just leave them blank.


The final choice that you must make is deciding on a privacy option. There are four options:
- Opt-in
- Opt-out
- Research
- Private
You can only pick one option, and each option is very different than the others. The first two are related to law enforcement matching.
If you choose Opt-in, which I recommend, your DNA kit will be available for finding DNA matches. Your kit could also show up as matched with DNA kits uploaded by law enforcement officials trying to identify victims or perpetrators of extremely violent crimes.
If you don't want your kit to show up for law enforcement matching, choose opt-out.
The last two options, research and private, are similar. Your private or research kit will not be available for matching and you will only be able to use analysis tools. I only recommend choosing these options if you have specific reasons that you need to keep your kit permanently private.
Blog posts to help you understand Gedmatch
- Gedmatch Beginner's Tutorial
- How to find DNA matches on Gedmatch
- Which Gedmatch Admixture to Use
- How to use the Gedmatch One to Many Tool
- How to use the Gedmatch One to One Tool
Conclusion
I hope that this post has helped you understand the steps that you should take to transfer your DNA from Ancestry to Gedmatch. I'm so excited that you are ready to take this step and learn so much more from your DNA!
If you have any questions about something that you read in this post, or if you would like to share something that you learned from making this transfer, please join us in the discussion below.
Thanks for stopping by today!
Kathleen
Wednesday 16th of February 2022
I uploaded my DNA from Ancestry toGedMatch. How do I see it? I didn’t get an email or anything saying it was uploaded.
Mercedes
Friday 18th of February 2022
When you log in to Gedmatch, you should see a list of your "DNA Resources", with a kit number that begins with one or two letters at the beginning. This is the number that you will use to run tools like the One-to-Many Comparison tool, which is how you can see your DNA matches on Gedmatch. It is a good starting point. Check out this post for more information about the basics of using Gedmatch: https://whoareyoumadeof.com/blog/gedmatch-tutorial-for-beginners/
Gail Ellis
Sunday 22nd of March 2020
Thanks so much for your instructions and insite.
Mercedes
Sunday 22nd of March 2020
You are SO welcome, Gail!!