In this post, I'll show you the easiest way to share Ancestry DNA results with friends or family, as well as make changes to your DNA Results Sharing list.
It's completely natural to be excited about your DNA results and want to share them with family or friends. In fact, it's one of the first things that people usually want to do!
I remember when I first got my DNA results, I couldn't wait to call my parents and my sisters to let them know what I found out.
Instead of taking screenshots, or trying to print out pages and pages of your results, why not just allow them special access to your results so they can see for themselves? Fortunately, it's simple to share your results and should only take a few minutes for you to do.
How to Share Ancestry DNA Results
The following steps will walk you through the process of sharing your results through your Sharing Preferences in your DNA test settings. In addition, I will also explain the difference role levels so you will know which to allow your family members to have.
I recommend following the steps in this post instead of giving your friend or relative direct access to your Ancestry DNA account using your username and password. The method described in this post is a more secure method, and allows you to retain complete control over your DNA data.
It's better to follow the process in this article instead of letting someone access your individual account. It will allow you to keep your password to your Ancestry account private, and protect your DNA test results.
Step One: Access your DNA Test Result Settings
In order to share your results, you'll need to start from your main DNA Insights page. From this page, there is a little tiny "gear" icon in the upper right side of the screen (on both the desktop and mobile version of the site). Click on this to access the settings for your DNA test results.
Here's an image to help you know where to click - it can be hard to spot if you aren't looking for it.
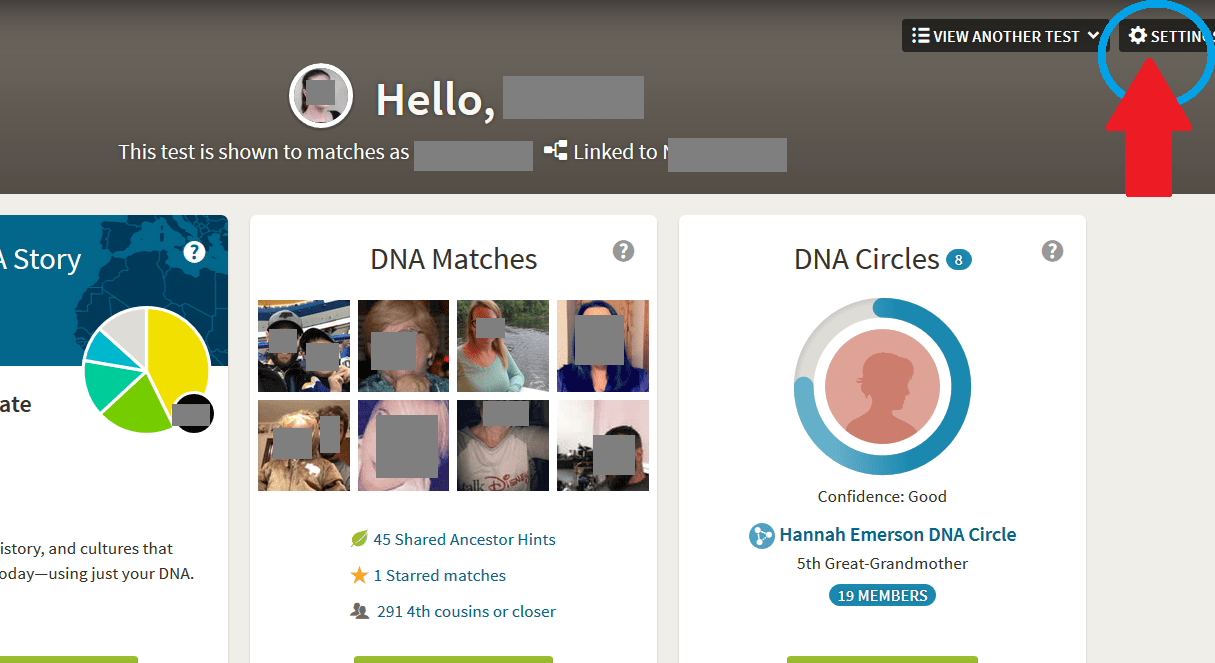
Clicking on the gear icon will take you to your DNA test settings page.
Step Two: Scroll down to the bottom of your test settings page to access the sharing option
Your DNA test settings page allows you to, along with several other things, give others access to your results. You'll have to scroll all the way to the bottom of the test settings page, since the sharing options are the next to the last section of the page.
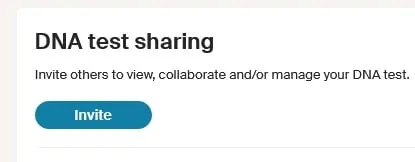
You will see "DNA test sharing" as a heading, and then you should click on the "DNA test sharing" subheading.

To add someone new, you will need to click the blue "Invite" link. You will be prompted to enter their e-mail address and choose a role (permissions level) for them.
Step Three: Enter the username or e-mail address of the person to whom you would like to give access to your DNA results
You will have to provide the e-mail address or username of the person who you would like to give access to your DNA results. Ancestry will send them an e-mail to notify them that you've given them access, and they will need to click on the link in their e-mail in order to add the access to their Ancestry account.
Can you share Ancestry DNA results with someone who hasn't done a DNA test?
Yes, you can share your Ancestry DNA results with someone who has not done a DNA test with Ancestry. All they need to do is create a free Ancestry account and provide you with the e-mail address that they used to set-up their account.
In other words, it is not necessary for a person to have done a DNA test to access your results, but they will need to have access to their own Ancestry account. This means that anyone, not just people who have done a DNA test themselves, can view your DNA results if you want them to.
That's great, right?
When they log into their account, they will just click on the DNA tab, just like you do, and they will see your DNA results, and those of anyone else who has allowed them access. Pretty cool!
How to choose a role for a family member on Ancestry DNA test sharing settings
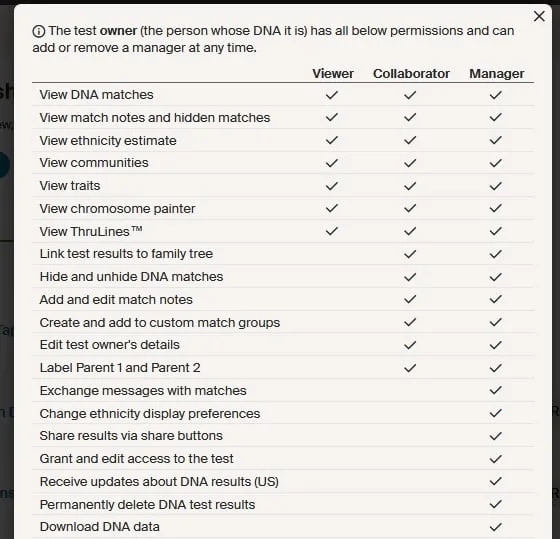
There are three access levels (roles) that you can grant your friend or family member to view your results:
- Viewer
- Collaborator
- Manager
You can view the specifics about each permission level, but here's a screenshot of it right here for the sake of our discussion:
Don't know which permission level is best?
What is a viewer on the Ancestry DNA test sharing preferences?
Basically, the viewer is the most basic level, allowing them to only view and make absolutely no changes or notes. This is best for someone you don't know well, or for a family member who isn't interested in helping you with your research.
What is a collaborator on the Ancestry DNA test sharing preferences?
A collaborator is someone you can trust, and who is also interested in helping you work on your family tree, or someone who is working on your family tree and DNA results for you.
The Collaborator will have all of the access that the Viewer has, as well as access to additional features. For example, they will be able to make notes on your DNA match list, as well as add matches to groups, etc.
In addition, the Collaborator could link the DNA test results to a tree, or change the person in the tree to whom the test is linked.
What is a Manager on the Ancestry DNA test sharing preferences?
Someone who is assigned the role of Manager through the Ancestry DNA test sharing settings has the highest level of access to test results. They will have access to everything that the Viewer and Collaborator does, as well as several additional functions.
For example, a test manager can invite others to view test results and change the access level of others with whom the results have been shared.
You should only give the role of "Manager" to someone that you trust absolutely, since they will be able to download your DNA data, send messages on your behalf, and allow others to access your DNA. This is best for a very close family member or friend who is going to be working on your DNA results for you.
In addition, a test manager can even delete test results. So, only give this level of access to someone if you absolutely must.
I recommend using only the viewer or collaborator roles, unless you are absolutely want to provide the highest of level of access to your results.
How do I remove or change someone's access to my Ancestry DNA results?
It happens sometimes that we realize that we should end someone's access to our DNA results, or we want to give them more access. You can easily delete someone from your DNA Result Access list by clicking the "X" by their name on your list.
You will be asked if you are sure by a little pop up message, and then they will be deleted and their access immediately terminated. They will not be notified that you have removed them from the list, but of course if they try to view your results, they just won't be able to click on your name anymore (it won't show up for them).
If you just want to change their access, you can easily just click the little down arrow by their current permission level, and choose the one that you would like them to have.
They will not be notified of the change, and they will only notice that you have given them more or less access the next time they are viewing your DNA results.
Conclusion
I hope that this post helped you learn the different ways you can share your results, and the difference access levels that you can give to your friends and family. If you have any questions, please do not hesitate to ask. I look forward to hearing from you in the comments.
Thanks for stopping by!
